Two approaches:
1. Create a new casting bar from scratch used in place of the game's default (pretty complex)
2. Modify the default casting bar to use your own graphics (MUCH simpler but prey to the textures being named and unique)
Method 1
1. You draw up the artwork and save them in blp format or tga. (As an aside, images need to be a power of 2 along each edge. ie: 64x64,128x128,256x128,etc)
2. You create an XML that defines placement of the elements you intend to use:
For instance, say you have the venerable arcanegauge.tga that looks like:
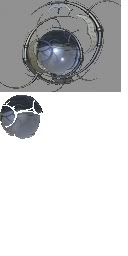
The file is 128 pixels wide and 256 pixels tall.
The "border" image goes from 0,0->120,92
The "guage" image goes from 0,95->43,139
The location of the textures within the file are referenced as a percent of the total:
Border left=0, right=0.9375, top=0, bottom=0.359375
Guage left=0, right=0.33594, top=0.3711, bottom=.54297
We want the guage drawn at 37,30 within the border (decal offset I think it was in eq)
Not to put it in the xml. In a typical XML, the file is laid out like:
(warning: I'm not testing any of this as I type. I'll try to later tonight when I have time)
Code:
<Ui xmlns="http://www.blizzard.com/wow/ui/">
	<Script file="MyMod.lua"/>
	<Frame name="MyModFrame">
		<!-- Attributes of the main MyModFrame: size, anchors, scripts, backdrop, etc -->
		<Layers>
			<Layer name="(something pre-defined: ARTWORK, BACKGROUND, OVERLAY">
				<!-- labels and textures that will be behind everything else -->
			</Layer>
		</Layers>
		<Frames>
			<!-- Buttons, sliders, things that will accept mouse clicks go here -->
		</Frames>
		<Scripts>
			<!-- Events (OnLoad, OnEvent, etc) for MyModFrame -->
		</Scripts>
	</Frame>
</Ui>
You can have layers within frames and frames within layers, and almost everything is optional. But for this example let's say we want to just having a casting bar texture that changes without user input. imho it's best as a Layer but you could put it in Frames too:
Code:
<Ui xmlns="http://www.blizzard.com/wow/ui/">
	<Script file="MyMod.lua"/>
	<Frame name="MyModFrame" parent="UIParent">
		<Size>
			<AbsDimension x="1" y="1"/>
		</Size>
		<Anchors>
			<Anchor point="CENTER"/>
		</Anchors>
		<Layers>
			<Layer name="OVERLAY"/>
				<Texture name="MyCastingBorder" file="Interface\AddOns\MyMod\arcanegauge">
					<Size>
						<AbsDimension x="128" y="32"/>
					</Size>
					<Anchors>
						<Anchor point="TOPLEFT" relativeTo="MyModFrame" relativePoint="TOPLEFT"/>
					</Anchors>
					<TexCoords left="0" right="0.9375" top="0" bottom="0.359375"/>
				</Texture>
			</Layer>
			<Layer name="ARTWORK"/>
				<Texture name="MyCastingGuage" file="Interface\AddOns\MyMod\arcanegauge">
					<Size>
						<AbsDimension x="128" y="32"/>
					</Size>
					<Anchors>
						<Anchor point="TOPLEFT" relativeTo="MyCastingBorder" relativePoint="TOPLEFT">
							<Offset>
								<AbsDimension x="37" y="30"/>
							</Offset>
						</Anchor>
					</Anchors>
					<TexCoords left="0" right="0.33594" top="0.3711" bottom=".54297"/>
				</Texture>
			</Layer>
		</Layers>
		<Scripts>
			<OnLoad>
				MyMod_OnLoad();
			</OnLoad>
			<OnEvent>
				MyMod_OnEvent();
			</OnEvent>
		</Scripts>
	</Frame>
</Ui>
Things to note:
- The .tga is dropped from arcangauge. You can use either .tga or .blp in your addons. It loads these files at startup and caches them. I typically use .blp since they're compressed and a malformed tga will crash WoW.
- We have two layers. ARTWORK will go below OVERLAY.
- We have no controls (buttons, etc) that want mouse clicks, so we don't have a <Frames> section at all
- Both textures use the same file but with different TexCoords to point to their important part
- The decal offset is done by defining an <Offset> relative to MyCastingBorder
- There is a <Size> and <Anchors> for the main frame, the casting border and the guage.
That's the basic xml bit. To get it to work, in the lua you hook the default casting functions and then use your casting bar instead. Actually programming it to react would be the hard part, and you will be in essence recreating the casting bar from scratch. Feel free to skip over parts that don't make sense, and skip down to Method #2 if you want.
Two ways to get it to use yours instead of the default:
1. Simple but unreliable way is to hide the default one from within yours: CastingBarFrame:Hide() at a good time (or every update on yours) will hide the other one.
2. More elegant but complex way is to replace the original entirely. In Interface\FrameXML\CastingBarFrame.lua are three functions:
function CastingBarFrame_OnLoad()
function CastingBarFrame_OnEvent()
function CastingBarFrame_OnUpdate()
You would need to create your own CastingBarFrame_OnEvent() and _OnUpdate() to use your work. To get the UI to use your versions, you would hook those functions. In MyMod.lua in the OnLoad():
Code:
function MyMod_OnLoad()
	CastingBarFrame_OnEvent = MyCastingBarFrame_OnEvent
	CastingBarFrame_OnUpdate = MyCastingBarFrame_OnUpdate
end

function MyCastingBarFrame_OnEvent()
	-- use my code
end

function MyCastingBarFrame_OnUpdate()
	-- use my code
end
The above is an "impolite" way to hook a function. Often an in-game function has a lot involved that may not have any relation to your mod. So use with care. A more polite way of hooking the function is by keeping the old one around to use if need be:
Code:
function MyMod_OnLoad()
	Old_CastingBarFrame_OnEvent = CastingBarFrame_OnEvent
	CastingBarFrame_OnEvent = MyCastingBarFrame_OnEvent

	Old_CastingBarFrame_OnUpdate = CastingBarFrame_OnUpdate
	CastingBarFrame_OnUpdate = MyCastingBarFrame_OnUpdate

	User_Wants_Default = false; -- user can toggle this somehow to go back to original casting bar
end

function MyCastingBarFrame_OnEvent()

	if User_Wants_Default then
		Old_CastingBarFrame_OnEvent()
	else
		-- use my code
	end
end

function MyCastingBarFrame_OnUpdate()

	if User_wants_Default then
		Old_CastingBarFrame_OnUpdate()
	else
		-- use my code
	end
end
Now you can toggle User_Wants_Default so that it will use either yours or the default.
As you can see it can get complex very fast. My mods that override the UI's default function (Auto Inner Fire, BestBuff) are very simple in what they do.
Method 2
This is the route I was going with in the above post: Let the UI handle all the programming bits, just change the artwork and if need be change the position/size for the new artwork.
Because we're not laying down our own XML, but using the game's default XML, our MyMod will remain very simple:
Code:
<Ui xmlns="http://www.blizzard.com/wow/ui/">
	<Script file="MyMod.lua"/>
	<Frame name="MyModFrame">
		<Scripts>
			<OnLoad>
				MyMod_OnLoad();
			</OnLoad>
			<OnEvent>
				MyMod_OnEvent();
			</OnEvent>
		</Scripts>
	</Frame>
</Ui>
Now we go see what textures the game is using by default:
In CastingBarFrame.xml we find:
<Texture file="Interface\CastingBar\UI-CastingBar-Border">
<Texture file="Interface\CastingBar\UI-CastingBar-Flash" alphaMode="ADD">
<Texture name="CastingBarSpark" file="Interface\CastingBar\UI-CastingBar-Spark" alphaMode="ADD">
<BarTexture file="Interface\TargetingFrame\UI-StatusBar"/>
Two things make this method unusable for the casting frame:
1. The elements we want to change aren't named. (only spark is named with name="CastingBarSpark")
2. It's using an element used elsewhere in the UI. So any change to this would affect the whole UI (which may be desirable if we're not changing the size/shape of the texture)
So we're going to pretend these are each named and the UI-Statusbar has a castingbar version (tons of parts of the UIs name every element, so this is just an example):
<Texture name="CastingBarBorder" file="Interface\CastingBar\UI-CastingBar-Border">
<Texture file="Interface\CastingBar\UI-CastingBar-Flash" alphaMode="ADD">
<Texture name="CastingBarSpark" file="Interface\CastingBar\UI-CastingBar-Spark" alphaMode="ADD">
<BarTexture name="CastingBarStatus" file="Interface\CastingBar\UI-StatusBar"/>
1. First, create a directory called Interface\CastingBar
3. Convert arcaneguage.tga to .blp
4. Copy the blp to CastingBar directory and rename it to UI-CastingBar-Border.blp
5. Copy the blp to CastingBar directory and rename it to UI-StatusBar.blp
Now, the game would use what was arcaneguage.tga for both the border and status bars. You could do this with the casting bar also but without a name to reference we can't change sizes/offsets/etc.
6. Edit MyMod.lua to look like:
Code:
function MyMod_OnLoad()
	this:RegisterEvent("PLAYER_ENTERING_WORLD");
end

function MyMod_OnEvent()
	CastingBarBorder:SetWidth(120);
	CastingBarBorder:SetHeight(92);
	CastingBarBorder:SetTexCoords(0,0,.92375,.359375);
	CastingBarStatus:SetWidth(44);
	CastingBarStatus:SetHeight(44);
	CastingBarStatus:SetTexCoords(0,.33954,.3711,.54297);
	CastingBarStatus:ClearAllPoints();
	CastingBarStatus:SetPoint("TOPLEFT","CastingBarBorder","TOPLEFT",37,30);
end
If the border and status textures were explicitly named, that's all you'd need to do to replace the default border and guage with a custom one.
Sadly it's not the case so the first method is probably better. I don't know how to enumerate frames in xml but if that's possible then you could enumerate through to get the texture id's and then manipulate them.
Sorry, I should've picked a far simpler example than the casting bar. But that hopefully points you in the right direction.